Reporting Services Barcode
Requirements
The following requirements must be satisfied before proceeding to the tutorial on Creating barcodes in Microsoft Reporting Services.- ConnectCode .Net Barcode SDK is installed.
- Visual Studio 2005/2008/2010/2012/2015 or SQL Server Business Intelligence Development Studio is installed.
- SQL Server Reporting Services (with Business Intelligence Studio) is installed.
- Access to the AdventureWorks (or AdventureWorks2008) database in SQL Server 2005, SQL Server 2008 or SQL Server 2012.
Setting up
After installing the ConnectCode .Net Barcode SDK, you will need to configure it to work with Microsoft Visual Studio and SQL Server Reporting Services. This means you need to copy the ConnectCodeBarcodeLibrary.dll into the necessary folders and edit the Reporting Services Configuration files/Visual Studio Configuration files to allow FullTrust permission.
Please visit the following subsections to setup the SDK for Visual Studio/Reporting Services.
- Configuring Visual Studio - 2005/2008/2010/2012/2015
- Configuring Reporting Services - 2005/2008/2012
Tutorial on creating a barcode in Microsoft Reporting Services
1. Launch Visual Studio 2005/2008/2010/2012/2015 or SQL Server Business Intelligence Development Studio.
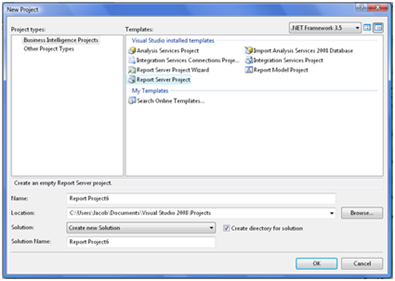
2. Create a new project by going to File :: New :: Project.
3. In the New Project dialog, select Business Intelligence Projects in the Project Types box. Choose Report Server Project. If you are using the Business Intelligence Studio, you can choose to create the Report Server Project Wizard. Click on the OK button when you are done.
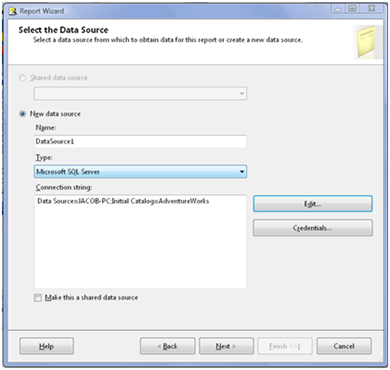
4. The Report Wizard dialog will be launched as shown in the diagram below. Select a New data source, leave the Name as the default and select Microsoft SQL Server as the type of database to use. Set up the Connection string to connect to your AdventureWorks database. You can click on the Edit button to launch the dialog for setting up the Connection string.
5. If you are using the Business Intelligence Studio, click Next and you will see the dialog as shown below. If you are using Visual Studio, right click Reports in the Solution Explorer and select Add New Report. A dialog will appear, click on the "Next" button and select the datasource you created previously.
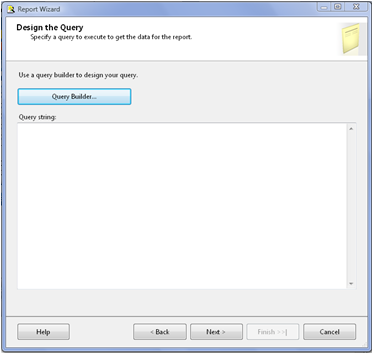
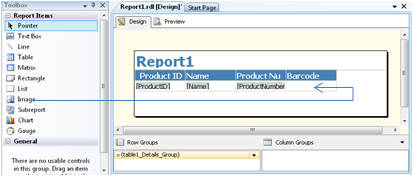
6. Enter "SELECT ProductID, Name, ProductNumber FROM Production.Product" for the Query string.
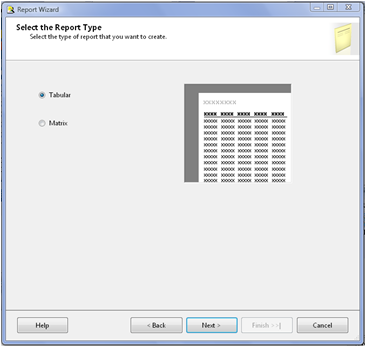
7. Click on the Next button and select the option Tabular for the Report Type.
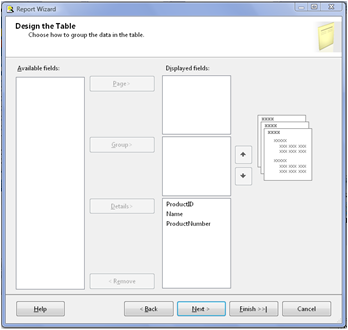
8. In the "Design the Table" page, add all the fields into the Details section as shown below. Click on the Finish button to complete the wizard.
9. You will see a Report1.rdl (RDL stands for Report Definition Language) file created in the Solutions Explorer.
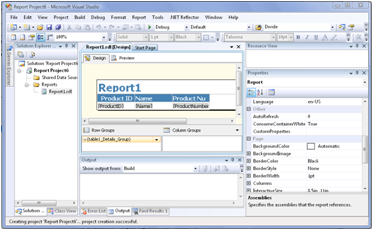
10. Create a new column for the report by right clicking on the Product Number Header followed by the option Insert Column->right. Name the new column Barcode.

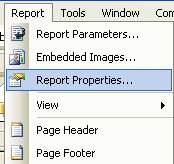
11. Next add a reference to the ConnectCodeBarcodeLibrary.dll. This may be done by choosing the Report menu and selecting Report Properties
You will also need to add references to the System.Drawing and System.Windows.Forms assemblies. You should see the Reference Tab of the Report Properties dialog as follows:
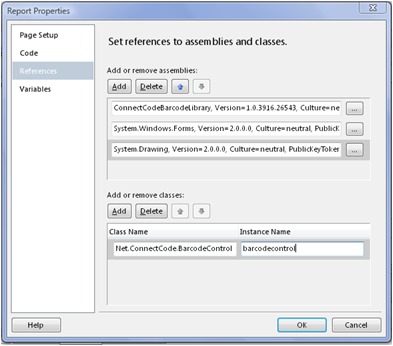
Create an instance of Connectcode Barcode Control by typing Net.ConnectCode.BarcodeControl under Class Name and name the instance as barcodecontrol. You are now ready to use the control in your project. The diagram above is captured using Business Intelligence Development Studio. The dialog looks slightly different in Visual Studio.
12. Next, switch to the Code Tab of the Report Properties dialog. Enter a VB function that will make use of the instance barcodecontrol that we have created earlier in the Reference tab.
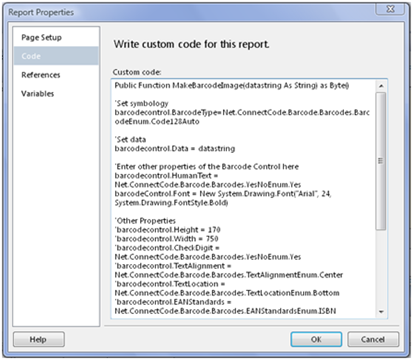
The actual code to be pasted is as shown below.
Public Function MakeBarcodeImage(datastring As String) as Byte()

'Set symbology

barcodecontrol.BarcodeType

 =Net.ConnectCode.Barcode.Barcodes.BarcodeEnum.Code128Auto


'Set data

barcodecontrol.Data = datastring


'Enter other properties of the Barcode Control here

barcodecontrol.HumanText

 = Net.ConnectCode.Barcode.Barcodes.YesNoEnum.Yes

barcodeControl.Font

 = New System.Drawing.Font("Arial", 24, System.Drawing.FontStyle.Bold)


'Other Properties

'barcodecontrol.Height = 170

'barcodecontrol.Width = 750

'barcodecontrol.CheckDigit

' = Net.ConnectCode.Barcode.Barcodes.YesNoEnum.Yes

'barcodecontrol.TextAlignment

' = Net.ConnectCode.Barcode.Barcodes.TextAlignmentEnum.Center

'barcodecontrol.TextLocation

' = Net.ConnectCode.Barcode.Barcodes.TextLocationEnum.Bottom

'barcodecontrol.EANStandards

' = Net.ConnectCode.Barcode.Barcodes.EANStandardsEnum.ISBN

'barcodecontrol.ExtendedStyle

' = Net.ConnectCode.Barcode.Barcodes.YesNoEnum.No

'barcodecontrol.BearersBar

' = Net.ConnectCode.Barcode.Barcodes.BearersEnum.TopBottom

'barcodecontrol.Rotation
' = Net.ConnectCode.Barcode.Barcodes.RotateEnum.Angle90

'barcodecontrol.MinBarWidth = 35

'barcodecontrol.BarWidthRatio = 3

'barcodecontrol.ITFQuietZone = 10


return barcodecontrol.GetPNGImage()


End Function
The MakeBarcodeImage(datastring As String) function takes in a string for its input parameter. This function, which uses the BarcodeControl, will encode the data and return a barcode image in PNG format. We will need to place this image in the Barcode column we have inserted into our report earlier.
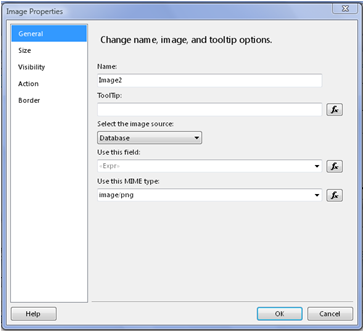
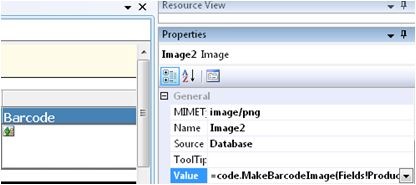
13. Next, drag an image from the toolbox into the Barcode column.
In Business Intelligence Studio a Wizard will pop up, you can enter the properties as shown below. In Visual Studio, select the image you have just dragged to modify its properties.
- Set the Source as Database and its MIME Type as image/png
- Set the Sizing property of the image to FitProportional
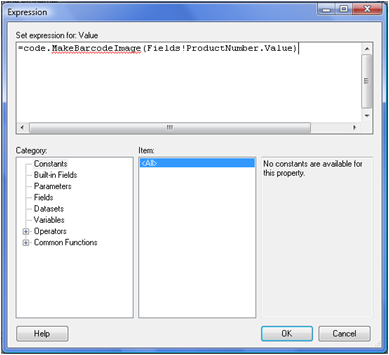
- Set the Value property of the image to
=Code. MakeBarcodeImage(value).
For example, if you have a data source table with a field named Product, you can set it as =Code.MakeBarcodeImage(Fields!ProductNumber.Value)
Visual Studio
14. You are now ready to preview the report. Click on the Preview tab and you should see barcode output as shown below.

If you get a System.Security.Permissions.SecurityPermission error when previewing the report, please make sure that you have followed the instructions in the Setting Up section correctly.