Windows Store Class Library for Barcodes (Windows 8)
The ConnectCodeBarcodeFontsLibrary.dll is a Windows Store apps Class Library and can be found in theResource\Windows8\Xaml\BarcodeFontsClassLibrary
subdirectory of the software package. The documentation of the class library can be found at
A sample Visual Studio (VS2012 or above) project using the Class Library is available in the Resource\Windows8\Xaml\Sample subdirectory to help kick start the development process.
Overview on the Barcode Class Library Sample
1. Open the BarcodeFontsWindows8.sln project with Visual Studio 2012 (or above) in the Resource\Windows8\Xaml\Sample subdirectory.2. Compile the app by going to Build->Build Solution.
3. Run the app in the Local Machine from the Toolbar. The following diagram shows how the Windows Store app looks like.
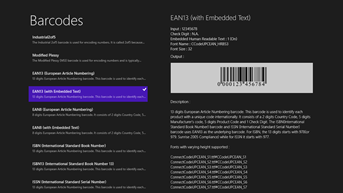
The sample is based on the Visual Studio Split App template. It allows a barcode symbology to be selected on the left and automatically generates the barcode on the right panel.
4. Stop the app by going back to Visual Studio.
The barcodes are generated using ConnectCode Barcode Fonts and ConnectCode Barcode Windows Store Class Library.
Go to the Solutions Explorer->Fonts folder. This folder contains the True Type Barcode Fonts (*.ttf) embedded in the app. It is important to note that not all barcode fonts available in ConnectCode software package are embedded into this sample app. If a different font is required, simply add the font from the software package into this folder in Visual Studio. The app itself also describes the different barcode fonts available.
ConnectCode Barcode Windows Store Class Library (ConnectCodeBarcodeFontsLibrary.dll) can be found in the Solution Explorer->References folder. A reference to this dynamic link library is required to aid the generation of check digits and encodation of the input data.
5. The programming codes that use the Class Library can be found in SplitPage.xaml.cs. The function that contains the Class Library code is shown below:
void ItemListView_SelectionChanged
(object sender, SelectionChangedEventArgs e)
The following C# code shows how a Code 39 barcode is generated.
Basically it involves setting the appropriate barcode font and using the Class Library to encode the input data.
itemREB.Foreground = new SolidColorBrush(Black);
double fontSize = 32;
string input = "12345678";
string fontFamily
= "/Fonts/ConnectCode39_S3.ttf#CCode39_S3";
Net.ConnectCode.Barcode.BarcodeFonts barcode
= new Net.ConnectCode.Barcode.BarcodeFonts();

if (sdi.UniqueId == "Code 39")
{
fontFamily
= "/Fonts/ConnectCode39_S3.ttf#CCode39_S3";
barcode.BarcodeType
= Net.ConnectCode.Barcode.BarcodeFonts.BarcodeEnum.Code39;
barcode.CheckDigit
= Net.ConnectCode.Barcode.BarcodeFonts.YesNoEnum.Yes;
}

.
.
.

barcode.Data = input;
barcode.encode();
string output = barcode.EncodedData;
string humantextoutput = barcode.HumanText;
//string isbnissntext = barcode.EANText;
itemREB.Document.SetText(None, output);
itemREB.Document.Selection.ParagraphFormat.Alignment
	= Windows.UI.Text.ParagraphAlignment.Center;
itemREB.FontFamily = new FontFamily(fontFamily);
itemREB.FontSize = fontSize;
Note : Refer to the Help file for the complete Application Programming Interface (API).