Create barcodes using fonts in Visual Studio Rdlc Report Designer
This tutorial illustrates how to create Rdlc barcodes using Visual Studio Rdlc Report Designer and ConnectCode Barcode Software and Fonts package.
Prerequisites
- Microsoft SQL Server 2016/2019 is installed
- Microsoft SQL Server Reporting Services (SSRS) is installed
- AdventureWorks Sample Database (or any other sample database)
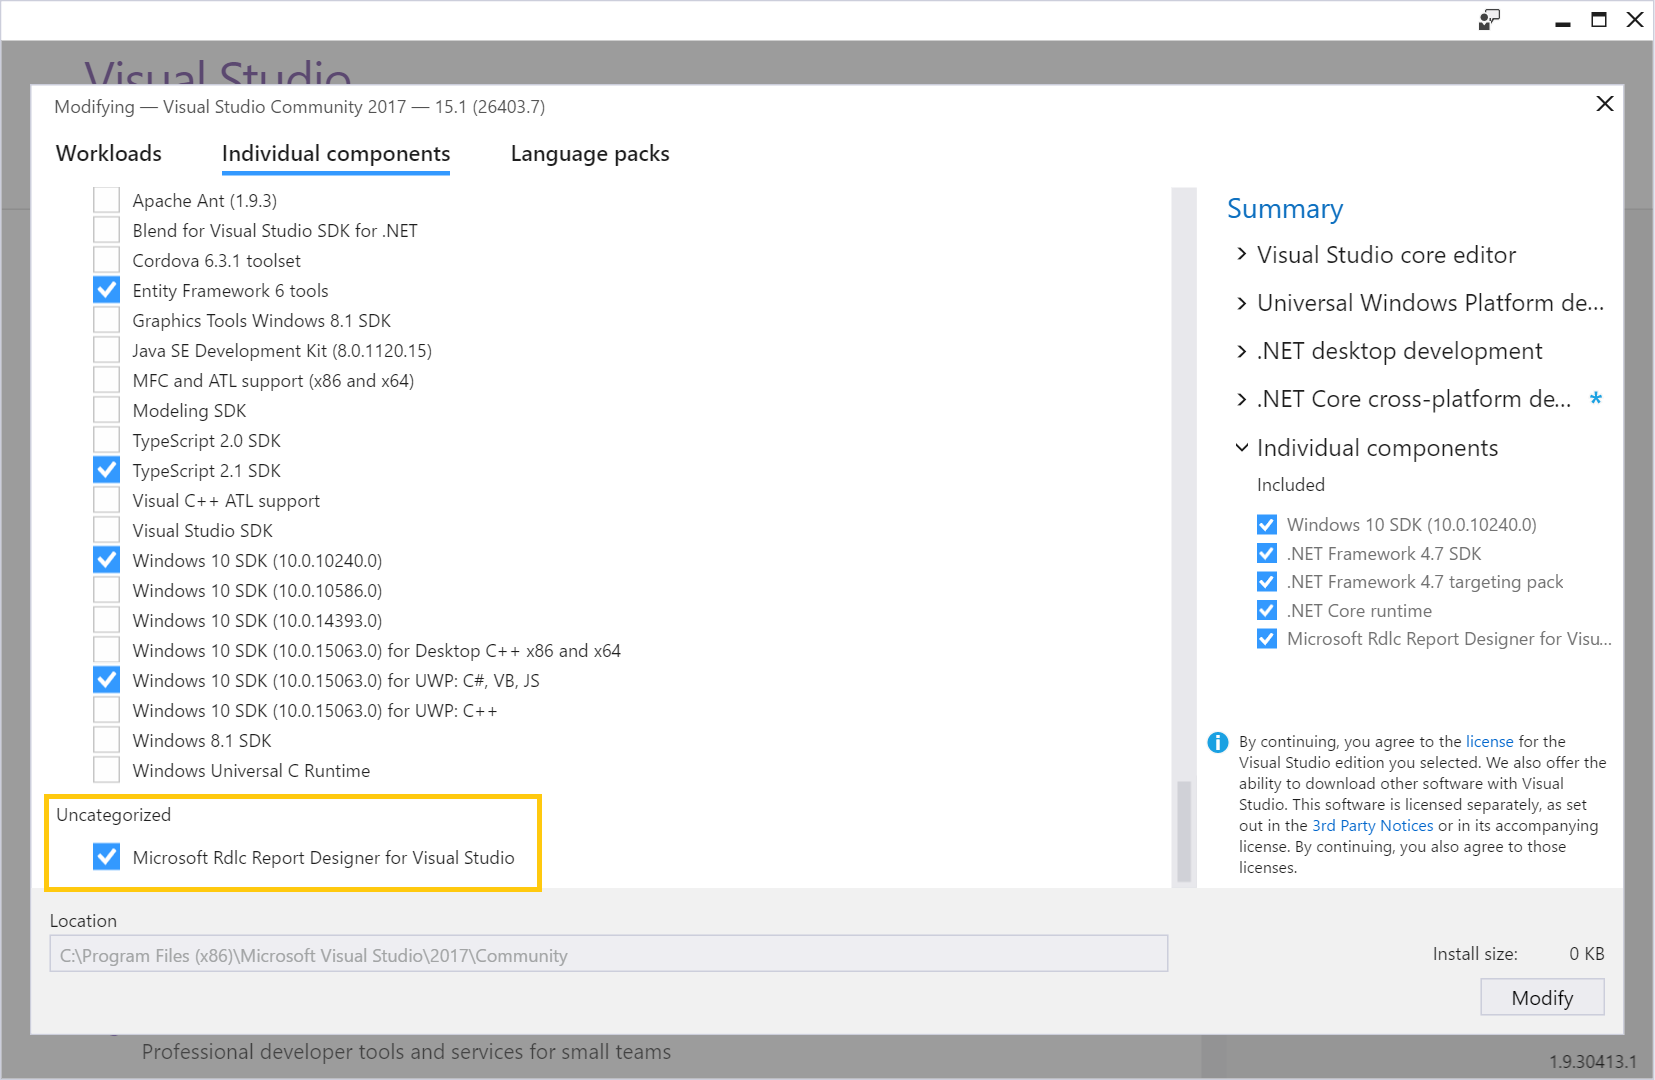
- Visual Studio 2017/2019 with Microsoft Rdlc Report Designer component installed
- ConnectCode Barcode Software and Fonts is installed
2. Launch "Visual Studio" and select "Visual C#" in "Templates". Select "Reports Application" as shown in the screenshot below. You may be prompted whether to trust the template, click on the "Trust" button.

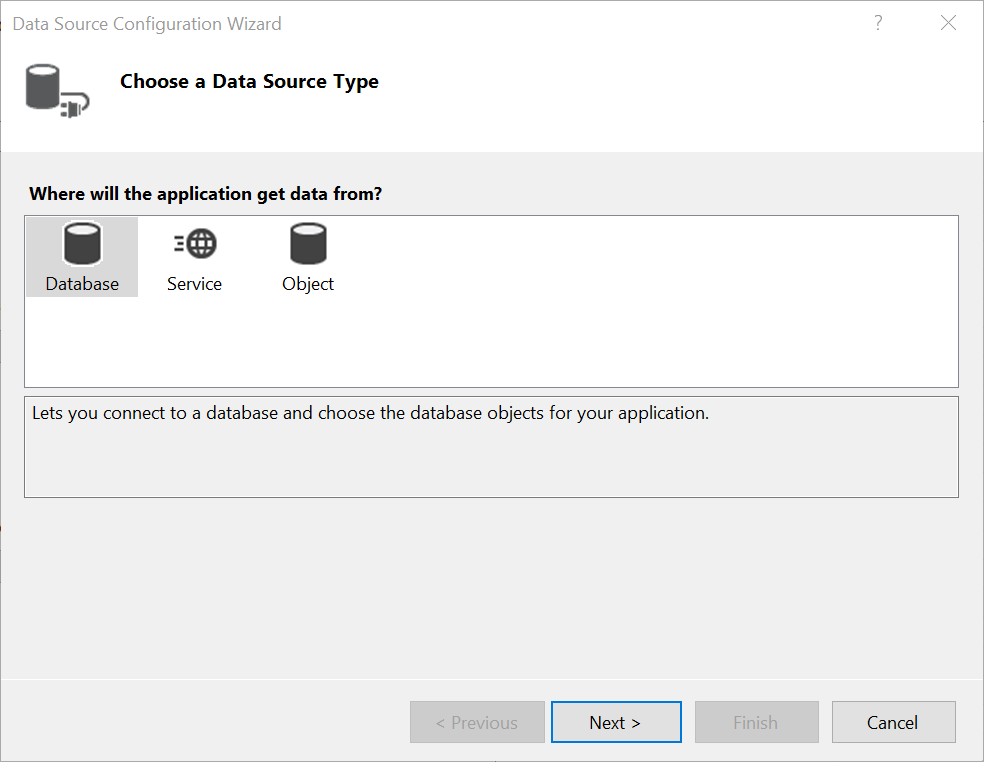
2. The "Data Source Configuration Wizard" will be launched to help you connect to a database and choose the database objects for your application. Select "Database" for "Where will the application get data from?" and click on the "Next button.
When prompted to select "Database Model", select "Dataset" and click on the "Next" button. In the "Choose Your Data Connection" dialog, click on "New Connection".
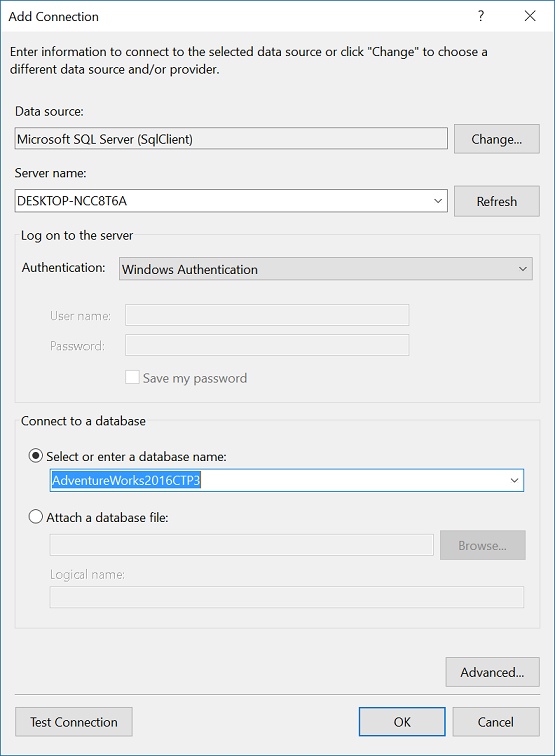
3. In the "Add Connection" dialog, select the "Server name", followed by "Select or enter a database name". The screen below shows that we have selected the "DESKTOP-NCC8T6A" server and the "AdventureWorks2016CTP3" database. This is possible because we have previously installed "SQL Server 2016" and the "AdventureWorks2016" sample database in the "DESKTOP-NCC8T6A" PC. You can click on "Test Connection" to ensure that you are able to connect to the database. Click on the "OK" button when you are done.
In the "Choose Your Data Connection" dialog, click on the "Next" button. In "Save the Connection String to the Application Configuration File" dialog, select "Yes" and accept the default string provided and click on the "Next" button.
4. In the "Choose Your Database Objects", ensure the "Product" table is selected and click on the "Finish" button. You should see the following in the "Report Wizard" dialog.
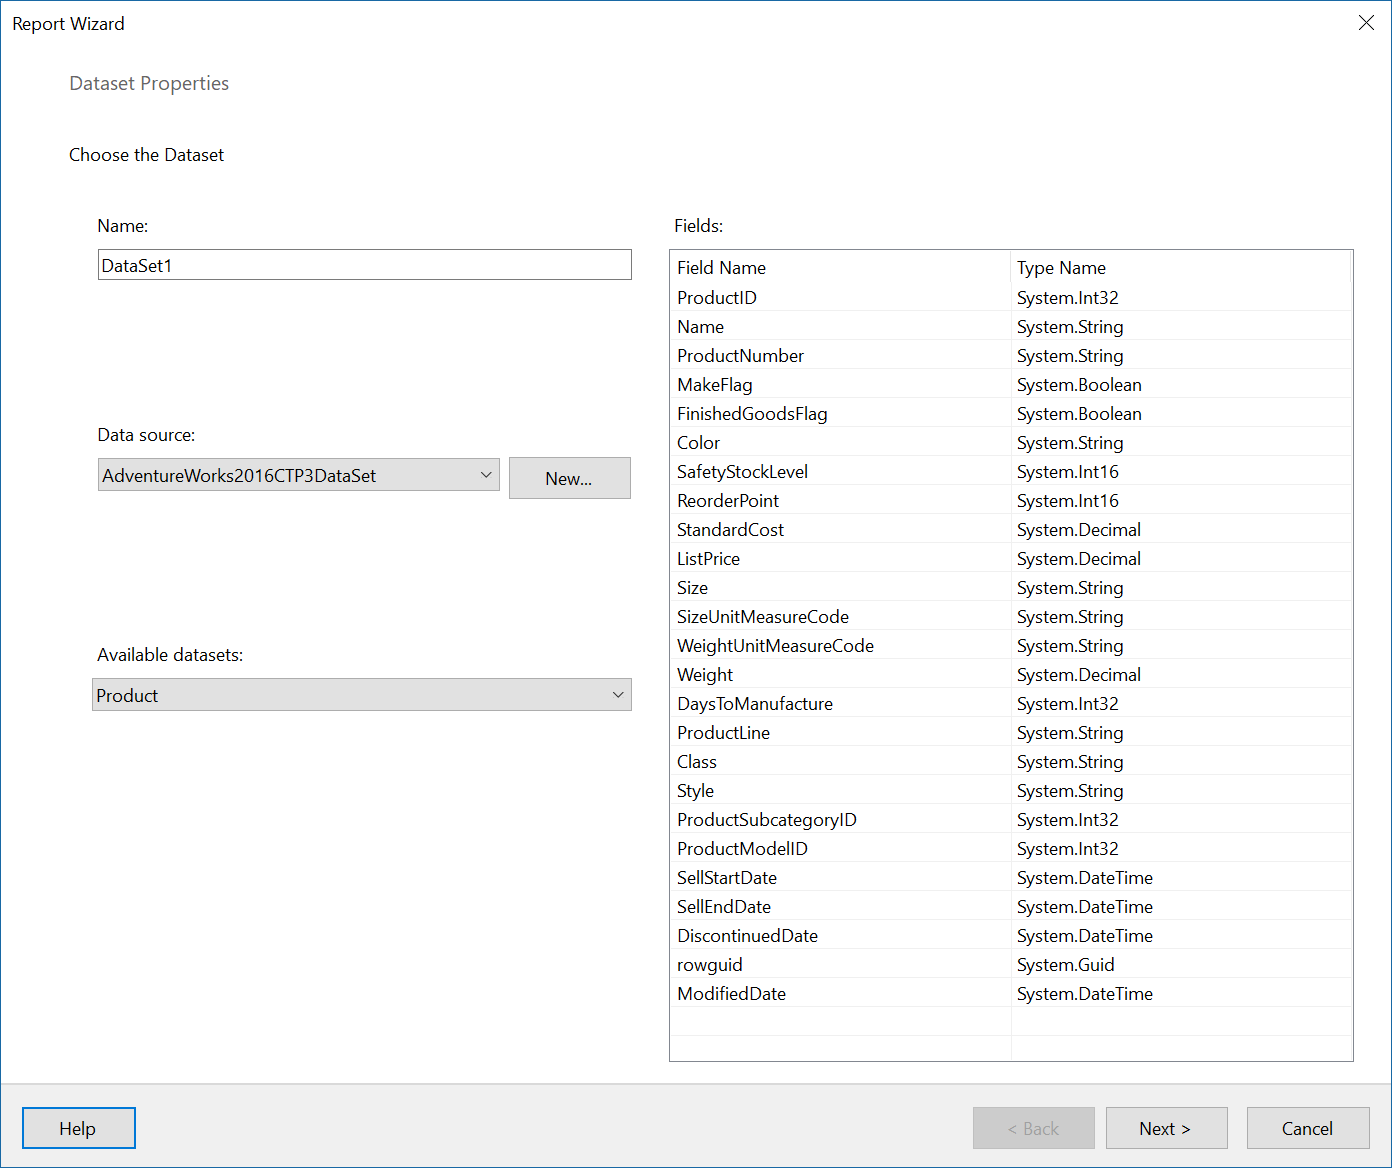
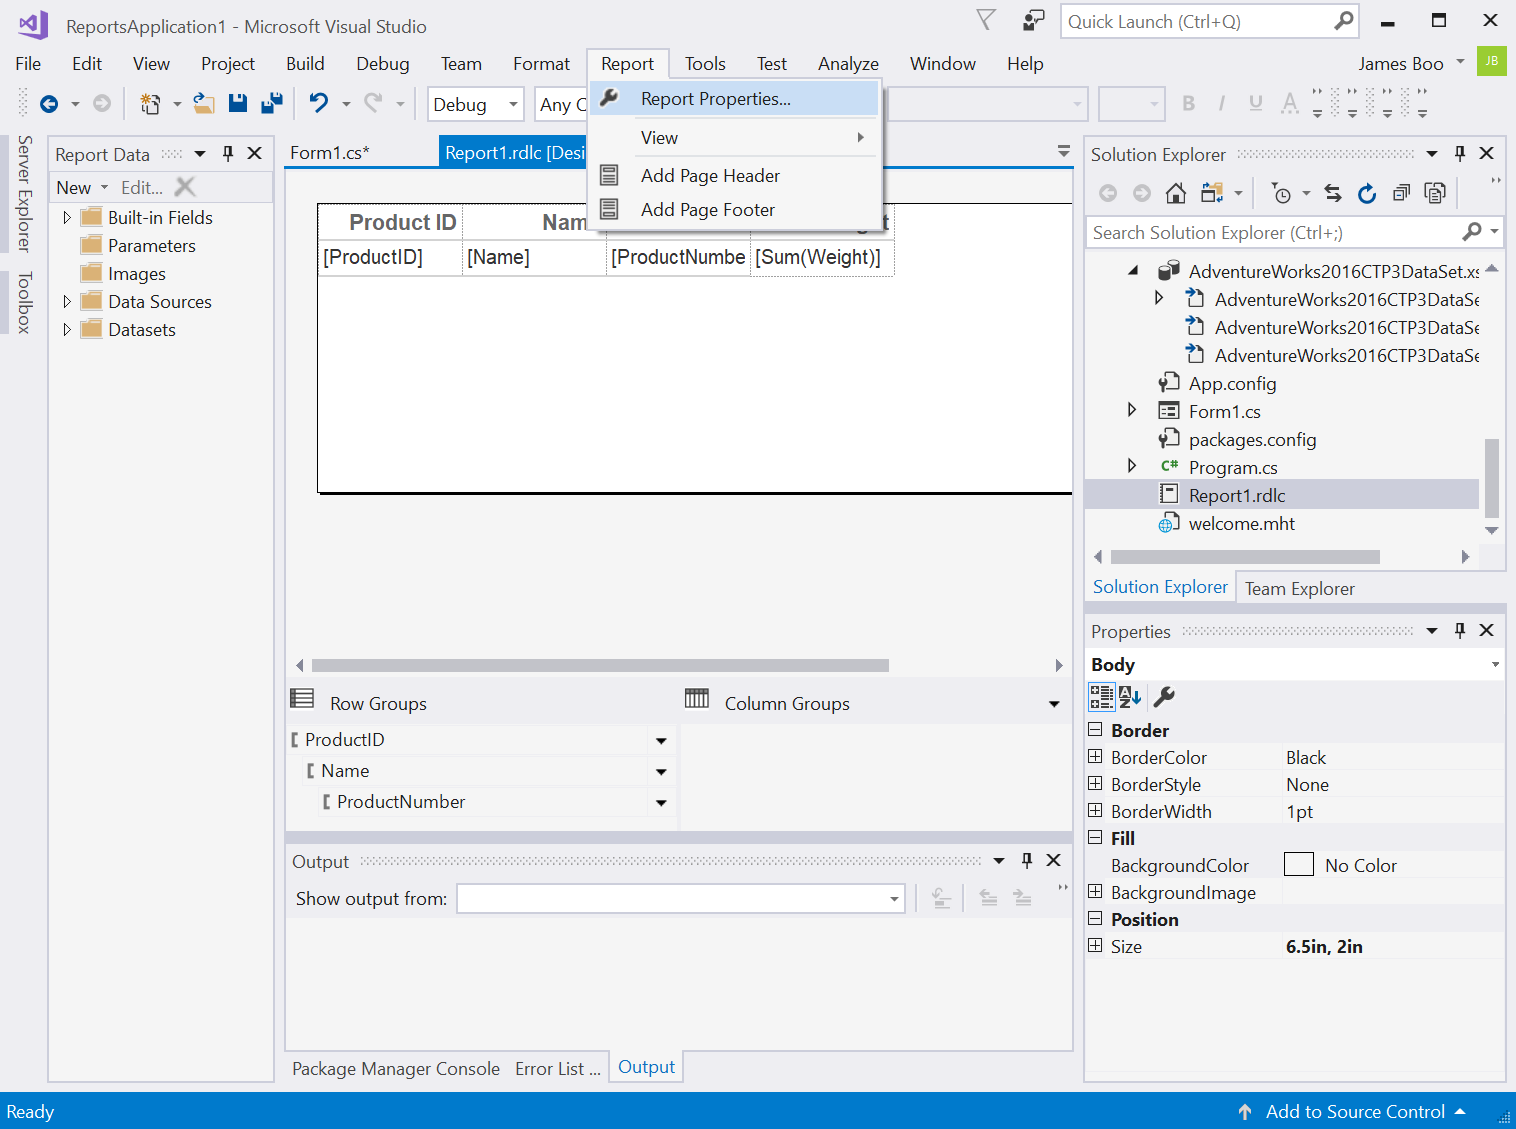
5. In the "Arrange fields" dialog, select "ProductID", "Name" and "ProductNumber" fields and add them into "Row groups". Select the "Weight" field, add it into "Values" and click on the "Next" button. In the "Choose the layout" dialog, unchecked the "Show subtotals and grand totals" and "Expand/collapse groups" option. Click on the "Next" button and in the "Preview" dialog and click on the "Finish" button. A sample Windows Form application with a Rdlc report as shown below will be generated.

6. Right click on "Form1.cs" in the "Solution Explorer" and select "View Code". Ensure that "Form1_Load" function contains the following programming codes. The programming codes below setup a data source with the "AdventureWorks" dataset. The data source is then added to "Report1.rdlc".
private void Form1_Load(object sender, EventArgs e)
{
 Microsoft.Reporting.WinForms.ReportDataSource reportDataSource1
  = new Microsoft.Reporting.WinForms.ReportDataSource();
 AdventureWorks2016CTP3DataSet dataset = new AdventureWorks2016CTP3DataSet();
 AdventureWorks2016CTP3DataSetTableAdapters.ProductTableAdapter data_ad
  = new AdventureWorks2016CTP3DataSetTableAdapters.ProductTableAdapter();
 AdventureWorks2016CTP3DataSet.ProductDataTable edt
  = new AdventureWorks2016CTP3DataSet.ProductDataTable();
 data_ad.Fill(edt);
 reportDataSource1.Name = "DataSet1";
 reportDataSource1.Value = edt;
 this.reportViewer1.LocalReport.DataSources.Clear();
 this.reportViewer1.LocalReport.DataSources.Add(reportDataSource1);
 this.reportViewer1.LocalReport.ReportPath = @"../../Report1.rdlc";
 this.reportViewer1.RefreshReport();
}
7. Now that we have our report setup, we are ready to make use of the DLL provided by ConnectCode Barcode Software and fonts package. Right click on "References" in the "Solutions Explorer" and select "Add References". Click on the "Browse" button and select the "ConnectCodeBarcodeFontsLibrary.dll" from the following folder.
C:\Program Files (x86)\ConnectCode\Resource\Net DLL Integration Samples\.Net4.0
Click on the "OK" button in the "Reference Manage" dialog.
Note: The DLL in "C:\Program Files (x86)\ConnectCode\Resource\Net DLL Integration Samples\DLL" is compiled with .Net 2.0 while the above DLL is compiled with .Net 4.0. Please select the required DLL for your project.
8. Double click on "Report1.rdlc" in the "Solution Explorer" and then click on the Visual Studio "Report->Report Properties" menu item.
9. Select the "References" tab, click on the "Add" button, followed by the "..." button. Select the "ConnectCodeBarcodeFontsLibrary.dll" from the following folder.
C:\Program Files (x86)\ConnectCode\Resource\Net DLL Integration Samples\.Net4.0
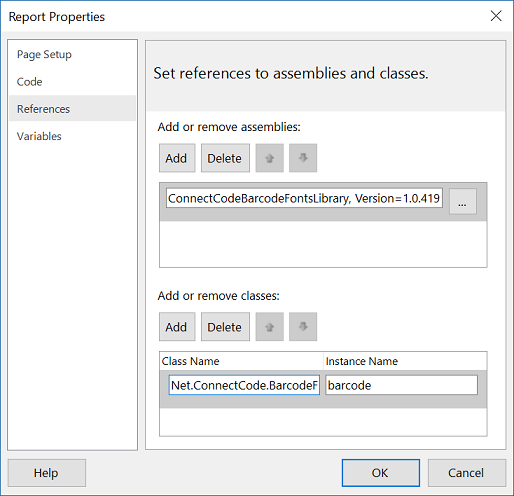
Click on "Add or remove class", enter "Net.ConnnectCode.Barcode.BarcodeFonts" as the class name and "barcode" as the "Instance Name".
10. Click on the "Code" tab and enter the following custom code. This custom code uses the "barcode" instance defined in the previous step to define a "MakeBarcode function. When the output characters (barcode.EncodedData) are applied with the Code 39 barcode font, an industry compliant Code 39 barcode will be generated.
Public Function MakeBarcode(datastring As String) as String

barcode.BarcodeType = Net.ConnectCode.Barcode.BarcodeFonts.BarcodeEnum.Code39

barcode.Data = datastring

barcode.CheckDigit = Net.ConnectCode.Barcode.BarcodeFonts.YesNoEnum.Yes

barcode.encode()

return barcode.EncodedData

End Function
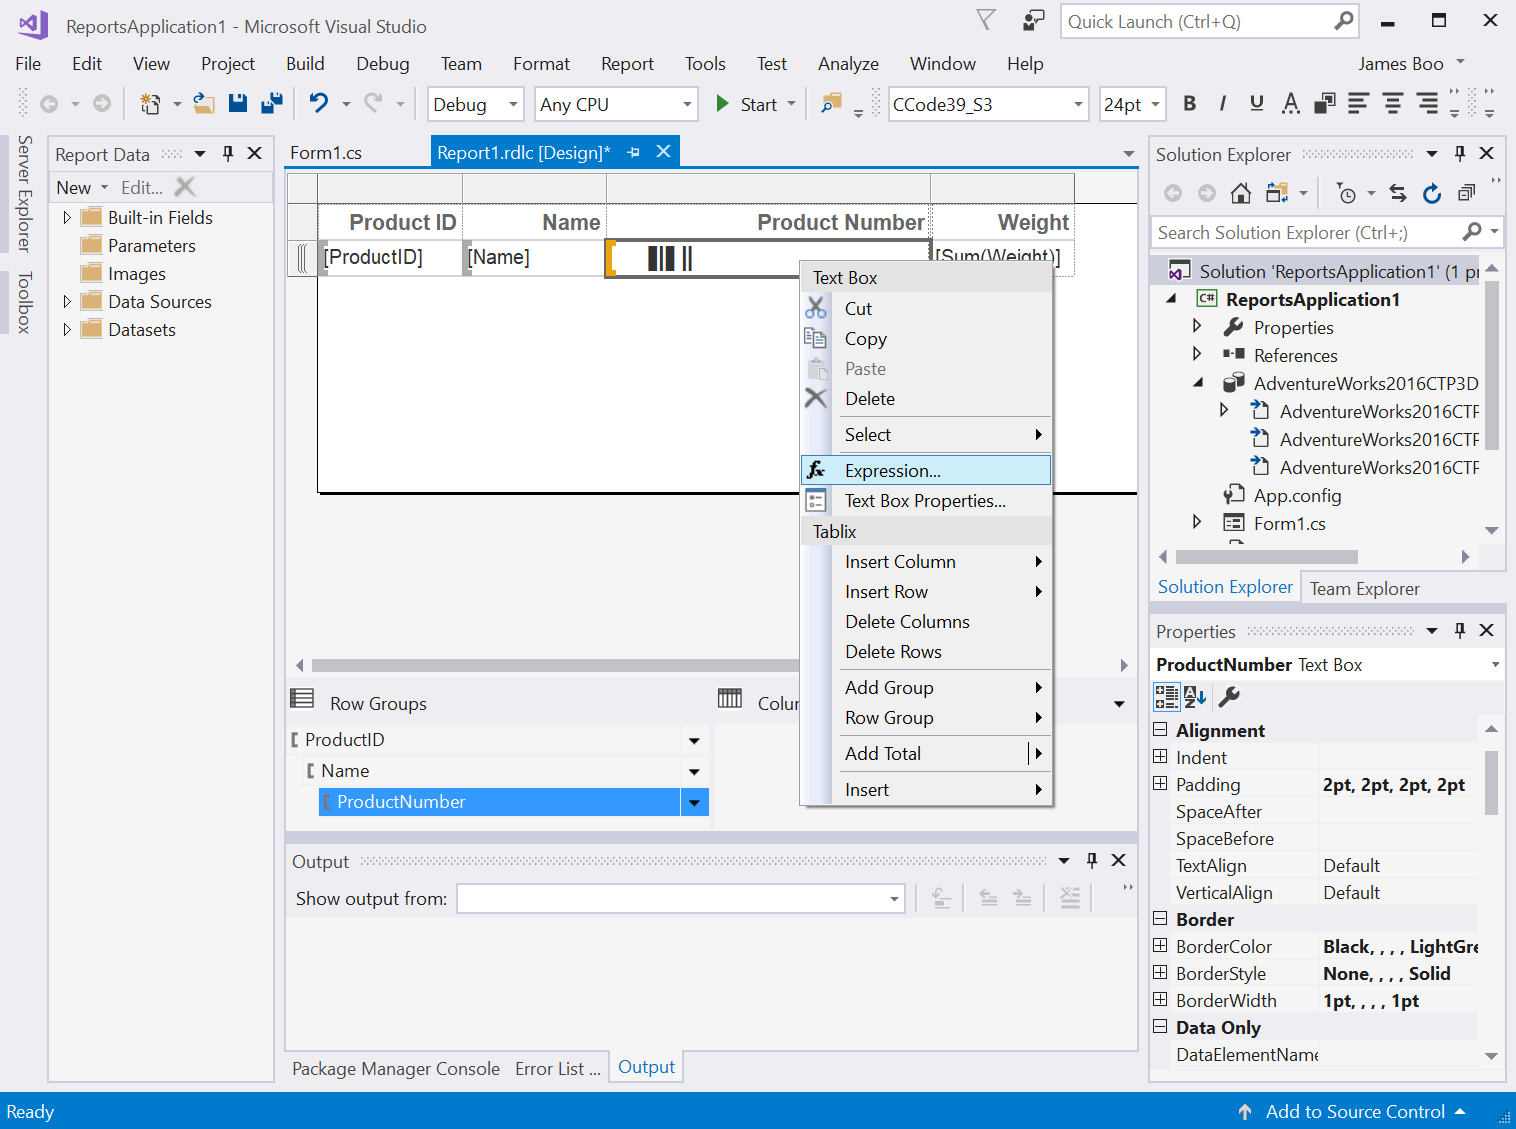
11. Next, we are going to apply the "MakeBarcode" function on the "[ProductNumber]" column in the report. Right click on the "[ProductNumber]" field and select "Expression".
Enter the following expression:
=Code.MakeBarcode(Fields!ProductNumber.Value)
Note: If you are going to deploy the report to Reporting Services, please ensure the ConnectCodeBarcodeFontsLibrary.dll is copied to the following folder.
C:\Program Files\Microsoft SQL Server\MSRS13.MSSQLSERVER\Reporting Services\ReportServer\bin
Please also add the following tag to the "rssrvpolicy.config" file.
<CodeGroup class="UnionCodeGroup" Name="BarcodeFonts" version="1" PermissionSetName="FullTrust"
Description="This code group grants ConnectCodeBarcodeFontsLibrary.dll FullTrust permission.">
<IMembershipCondition class="UrlMembershipCondition" version="1"
Url="C:\Program Files\Microsoft SQL Server\MSRS13.MSSQLSERVER\
Reporting Services\ReportServer\bin\ConnectCodeBarcodeFontsLibrary.dll"/>
</CodeGroup>
The "rssrvpolicy.config" file is available in the following folder:
C:\Program Files\Microsoft SQL Server\MSRS13.MSSQLSERVER\Reporting Services\ReportServer\rssrvpolicy.config
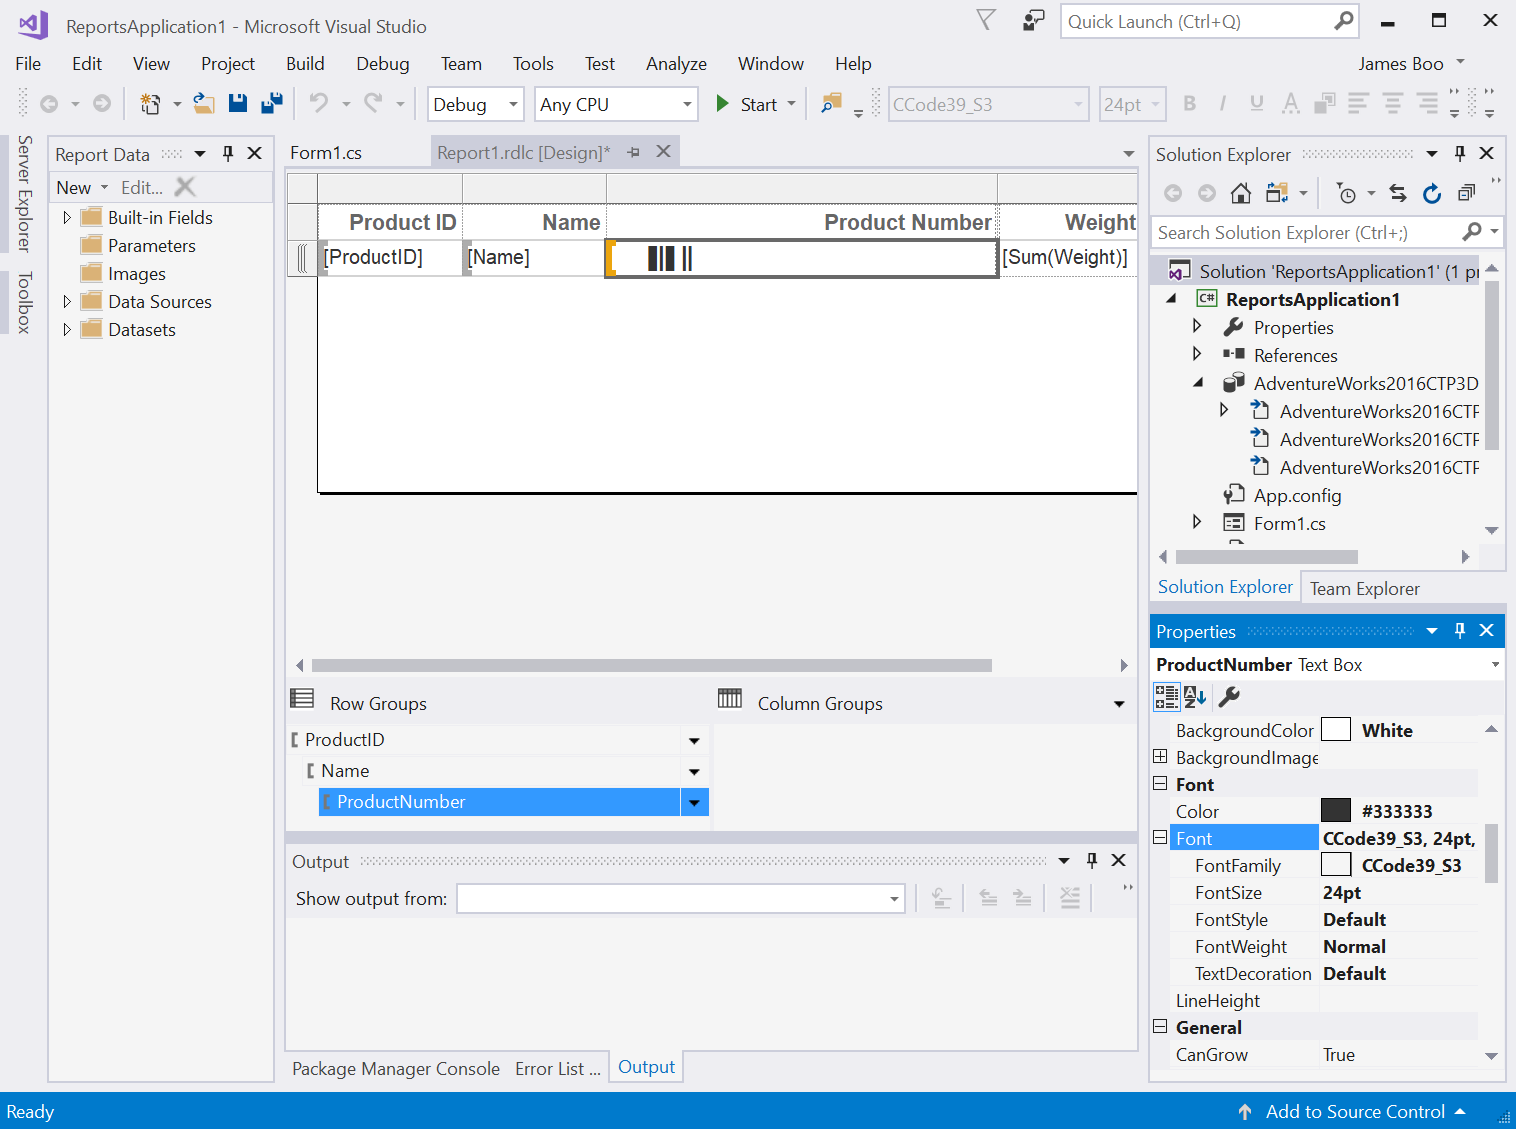
12. The final step is to apply the Code 39 barcode font on the output generated by the DLL. Select the "[ProductNumber]" field. This is the same field which we apply our expression in step 11. In the "Properties" section of Report Builder, select the CCode39_S3 (or CCode39_S3_Trial) as the FontFamily and set the FontSize to 24.
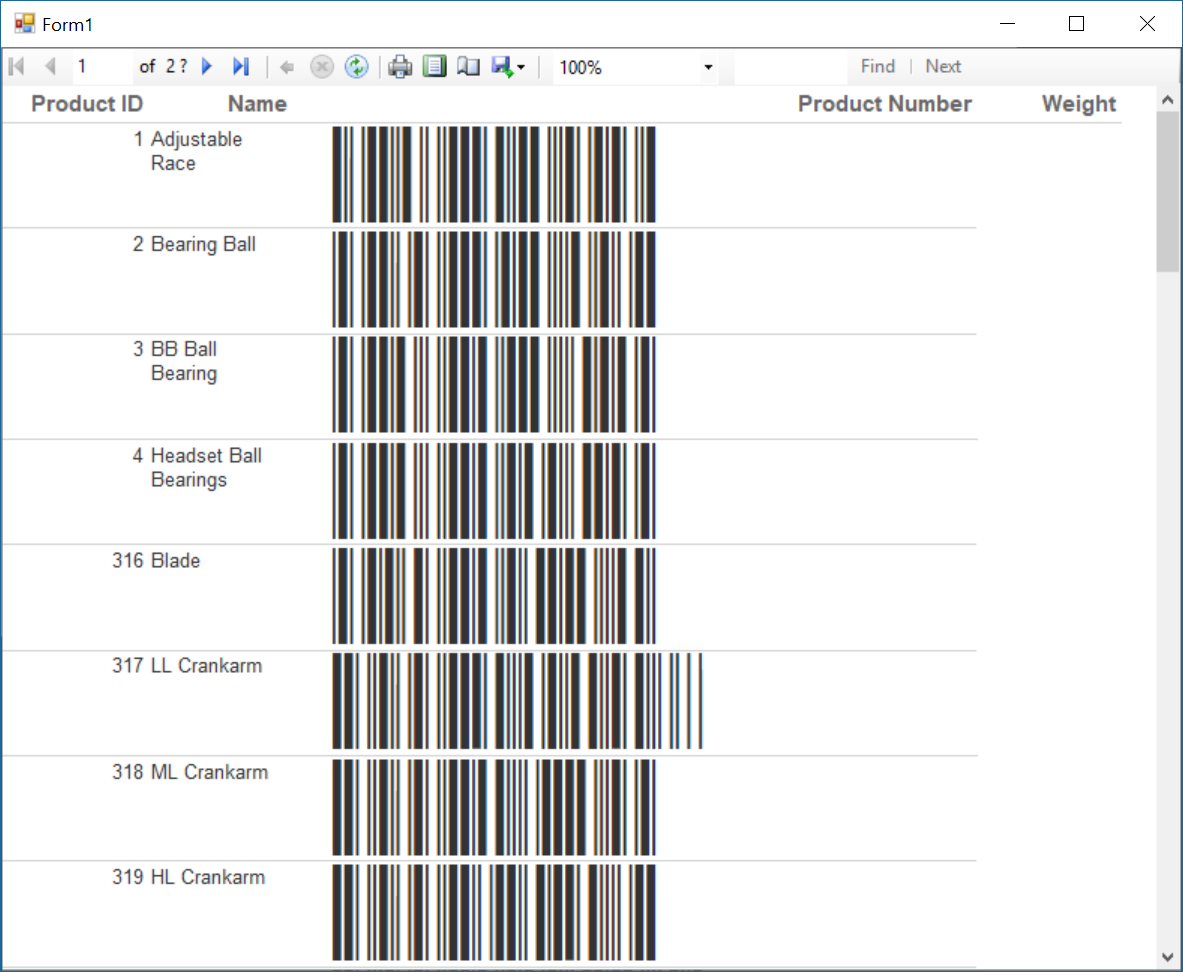
13. Click on "Start" button in Visual Studio and you will see the report with the generated barcodes.