Barcode Software and Fonts for Android
Android is a popular operating system designed to run on smartphones and tablet computers. As the demand for mobile devices grow, the demand for creating and displaying barcodes on applications running on these mobile devices also increases. Some of the common use cases of using barcodes on mobile devices include printing barcodes for ticketing, document tracking and barcode labeling.Applications in Android are developed in the Java programming language using the Android Software Development Kit. ConnectCode Barcode Software and Fonts supports the creation of barcodes on many mobile devices including Android using barcode web fonts. It also supports the creation of barcodes in Android Applications using Java and True Type fonts.
Java Barcode Class Library for Android
This document and the tutorial below focus on the use of the Java Application Class Library provided in ConnectCode at the following location:The class library enables the verification of input data, addition of barcode check digits and start/stop characters quickly and easily. With the use of fonts (instead of images), a resolution independent barcode that meets the strictest industry requirements can be easily created in Android Applications. The complete documentation of the class library can be found in the help file of the software package.
Creating barcodes in Android Applications
This tutorial assumes the creation of a new Android Application Project and uses Android Developer Tools v21.0.1. It also provides pointers on bundling the Barcode Fonts and referencing the Java Class Library. Android developers can also use the following as a reference to add industrial strength barcode capabilities into their own applications.- Download, install and launch Eclipse - Android Developer Tools (ADT).
- Go to the menu File -> New -> Android Application Project. Enter "AndriodBarcode" as the name of the application.
- Select API 12: Android 3.1 (Honeycomb) as the minimum Required SDK. Though ConnectCode also works with earlier version of the Android SDK, we only certify and provide official support for Android 3.1 onwards. Click on the Next button until the Create Activity screen and select the MasterDetailFlow activity. Click Next and Finish.
- Now add the Java Class Library. Go to Project -> Properties -> Java build Path and select the Libraries tab. Click on the Add External JARs button. Select the ConnectCodeBarcodeFontLibrary.jar (in the Resource\Java subdirectory of ConnectCode).
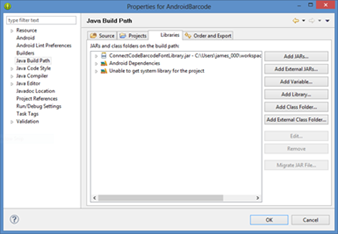
- Go to the Order and Export tab. Check the ConnectCodeBarcodeFontLibrary.jar. Click OK to return to the main screen. You will notice that a Referenced Libraries folder with the ConnectCode Class Library is added to Package Explorer.
- Select and click on AndroidManifest.xml in Package Explorer. Add the following line to the application tags.
<activity android:name="net.connectcode" />
The manifest file should look something like the following:
<application>
.
.
.
  <activity android:name="net.connectcode" />
</application>
-
Next, we will like to add the barcode fonts to this Android project. Right click on assets in Package Explorer, select New -> Folder and click OK. Launch Windows Explorer (in Windows) and navigate to ConnectCode (e.g. C:\Program Files\ConnectCodeTrial) directory. Select all the TrueType font files (*.ttf) in this directory and copy the files to the barcodefonts folder created in Eclipse in the previous step. The folder is typically located in the following directory :
C:\Users\\workspace\AndroidBarcode\assets\barcodefonts
After the files are copied, Eclipse will detect and display the files in the Package Explorer as shown below. Sometimes, you may need to right click on the barcodefonts folder and select Refresh to see the added files.

-
We are now ready to generate and display the barcodes. In Package Explorer, click on the src -> com.example.androidbarcode.dummy -> DummyContent.java file. Replace the Items with the following :
 static {
  // Add 3 sample items.
  addItem(new DummyItem("1", "Code 39"));
  addItem(new DummyItem("2", "Code 39 ASCII"));
  addItem(new DummyItem("3", "Code 128A"));
	}
In Package Explorer, click on the src -> com.example.androidbarcode -> ItemDetailFragment.java file. Locate the onCreateView function.
Replace the following code :
// Show the dummy content as text in a TextView.
if (mItem != null) {
   ((TextView) rootView
	       .findViewById(R.id.item_detail))
	       .setText(mItem.content);
}
with
if (mItem != null)
{

    TextView barcodeView=((TextView)
		rootView
		.findViewById(R.id.item_detail));
    String barcodeType=mItem.content;
    String input="12345678";
    String output="";
    Typeface tf = null;
    String humanReadableText="";
    if (barcodeType.equals("Code 39"))
    {
    Code39 barcode=new Code39();
    tf = Typeface
	 .createFromAsset(
          getActivity().getAssets(),
	  barcodefonts/ConnectCode39_S3_Trial.ttf");
    output=barcode.encode(input, 1);
    //2nd Param indicates Check Digit
    humanReadableText=barcode.getHumanText();
    }
    else if (barcodeType == "Code 39 ASCII")
    {
    Code39ASCII barcode=new Code39ASCII();
    tf = Typeface
         .createFromAsset(
	  getActivity().getAssets(),
	  "barcodefonts/
           ConnectCode39_S3_Trial.ttf");
    output=barcode.encode(input, 1);
    //2nd Param indicates Check Digit
    humanReadableText=barcode.getHumanText();
    }
    else if (barcodeType == "Code 128A")
    {
    Code128A barcode=new Code128A();
    tf = Typeface
         .createFromAsset(
          getActivity().getAssets(),
	  "barcodefonts/
           ConnectCode128_S3_Trial.ttf");
    output=barcode.encode(input);
    humanReadableText=barcode.getHumanText();
    }
    barcodeView.setTypeface(tf);
    barcodeView.setText(output);
    barcodeView.setTextSize(32);

}
The programming codes above uses the Java Barcode Class Library and barcode fonts Typeface to generate barcodes. A complete listing of the codes can be found at ItemDetailFragment.
-
Finally, run the application in and Android Virtual Device. You should be able to see the barcodes as shown in the diagram below :
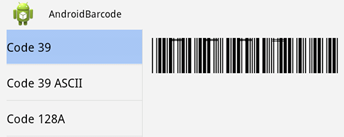
Note : The horizontal markings on the barcodes will only appear in the trial version of the software.