Create barcodes in a Reporting Services Report with SQL Server Data Tools
SQL Server Data Tools (SSDT) is a modern development tool for building SQL Server relational databases, Azure SQL databases, Analysis Services data models, Integration Services packages, and Reporting Services reports. This tutorial illustrates how to create industrial quality barcodes in a Reporting Services Report with SSDT using Visual Studio.
Prerequisites
- Visual Studio 2017 or 2019 with Microsoft Reporting Services Projects templates installed
- SQL Server Data Tools (SSDT) for Visual Studio or Standalone installed. The SSDT component can be found in Visual Studio installer -> Workloads -> Data storage and processing.
- SQL Server 2017 or 2019 installed
- AdventureWorks database (or other database) installed
- Microsoft Reporting Services installed
- ConnectCode Barcode Software and Fonts installed
Configuring Visual Studio
Copying "ConnectCodeBarcodeFontsLibrary.dll"
You need to copy "ConnectCodeBarcodeFontsLibrary.dll" (Resource\Net DLL Integration Samples\DLL\.Net4.0 subdirectory) to the "SSRS" directory of Visual Studio. The default location of this directory is at
C:\Program Files (x86)\Microsoft Visual Studio\2019\Enterprise\Common7\IDE\CommonExtensions\Microsoft\SSRS

or

C:\Program Files (x86)\Microsoft Visual Studio\2017\Enterprise\Common7\IDE\CommonExtensions\Microsoft\SSRS
If you are using the msix style installer for Windows 11, the "ConnectCodeBarcodeFontsLibrary.dll" is in the "Resource.zip" file.
You will also need to copy "ConnectCodeBarcodeFontsLibrary.dll" to the "PrivateAssemblies" directory of Visual Studio.
C:\Program Files (x86)\Microsoft Visual Studio\2019\Enterprise\Common7\IDE\PrivateAssemblies

or

C:\Program Files (x86)\Microsoft Visual Studio\2017\Enterprise\Common7\IDE\PrivateAssemblies
Editing "RSPreviewPolicy.config" to grant FullTrust permission
The "RSPreviewPolicy.config" is the preview policy file of Report Designer.
C:\Program Files (x86)\Microsoft Visual Studio\2019\Enterprise\Common7\IDE\CommonExtensions\Microsoft\SSRS\RSPreviewPolicy.config

or

C:\Program Files (x86)\Microsoft Visual Studio\2017\Enterprise\Common7\IDE\CommonExtensions\Microsoft\SSRS\RSPreviewPolicy.config
The following tag needs to be added to the "RSPreviewPolicy.config" file to grant FullTrust permission to the "ConnectCodeBarcodeFontsLibrary.dll". This is required for previewing a Report that uses a DLL in the Report Designer.
<CodeGroup class="UnionCodeGroup" Name="BarcodeFonts" version="1" PermissionSetName="FullTrust"
Description="This code group grants ConnectCodeBarcodeFontsLibrary.dll FullTrust permission.">
<IMembershipCondition class="UrlMembershipCondition" version="1"
Url="C:\Program Files (x86)\Microsoft Visual Studio\2019\Enterprise\Common7\IDE\
CommonExtensions\Microsoft\SSRS\ConnectCodeBarcodeFontsLibrary.dll"/>
</CodeGroup>

or

<CodeGroup class="UnionCodeGroup" Name="BarcodeFonts" version="1" PermissionSetName="FullTrust"
Description="This code group grants ConnectCodeBarcodeFontsLibrary.dll FullTrust permission.">
<IMembershipCondition class="UrlMembershipCondition" version="1"
Url="C:\Program Files (x86)\Microsoft Visual Studio\2017\Enterprise\Common7\IDE\
CommonExtensions\Microsoft\SSRS\ConnectCodeBarcodeFontsLibrary.dll"/>
</CodeGroup>
Configuring Reporting Services
At a file level SQL Server Reporting Services is now completely separated from SQL Server file structure. This different from previous versions of Reporting Services and SQL Server.
Copying "ConnectCodeBarcodeFontsLibrary.dll"
You need to copy "ConnectCodeBarcodeFontsLibrary.dll" (Resource\Net DLL Integration Samples\DLL\.Net4.0 subdirectory) to the "ReportServer\bin" directory of SQL Server Reporting Services. The default location of this directory is at
C:\Program Files\Microsoft SQL Server Reporting Services\SSRS\Reporting Services\ReportServer\bin
Editing "rssrvpolicy.config" to grant FullTrust permission
The "rssrvpolicy.config" is the Report Server policy configuration file. The default path for this file is shown below:
C:\Program Files\Microsoft SQL Server Reporting Services\SSRS\Reporting Services\ReportServer\rssrvpolicy.config
The following tag needs to be added to the "rssrvpolicy.config" file. It grants FullTrust permission to ConnectCodeBarcodeFontsLibrary.dll in the Report Server.
<CodeGroup class="UnionCodeGroup" Name="BarcodeFonts" version="1" PermissionSetName="FullTrust"
Description="This code group grants ConnectCodeBarcodeFontsLibrary.dll FullTrust permission.">
<IMembershipCondition class="UrlMembershipCondition" version="1"
Url="C:\Program Files\Microsoft SQL Server Reporting Services\SSRS\
Reporting Services\ReportServer\bin\ConnectCodeBarcodeFontsLibrary.dll"/>
</CodeGroup>
Create barcodes in a Report Server project (SSDT Reporting Services)
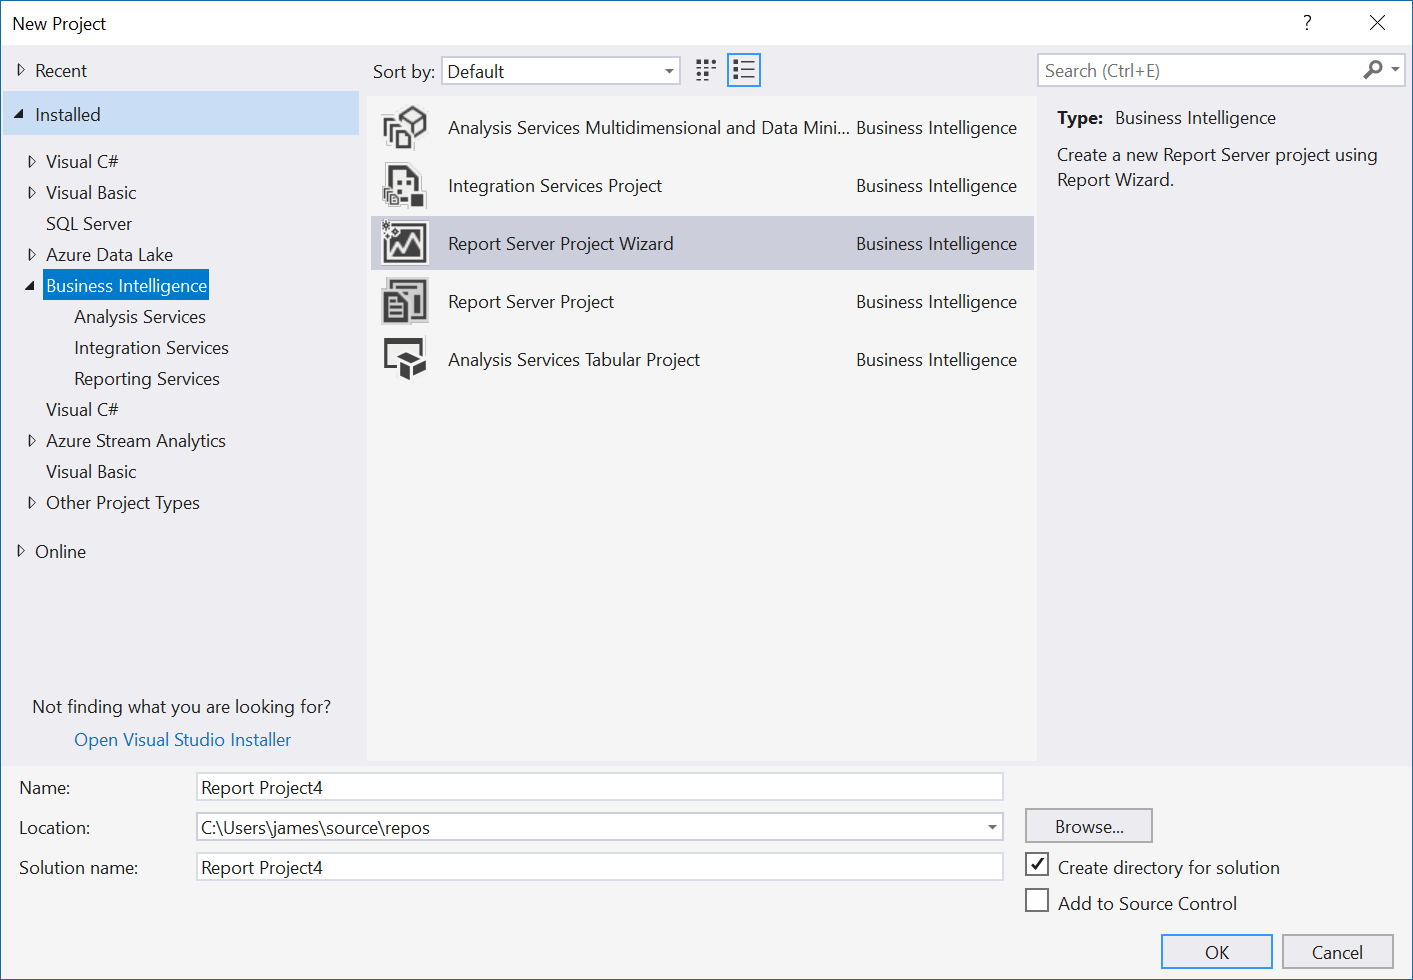
1. Launch Visual Studio and create a new Project. Select "Report Server Project Wizard". Enter a name for your project and click on the "OK" button. If you did not see the "Report Server Project Wizard" item in your project type, make sure you have installed SSDT successfully.
2. A "Welcome to the Report Wizard" will be launched to provide you with an overview of the steps required to create a report. Click on the "Next" button. You should see the "Select the Data Source" dialog as shown below:
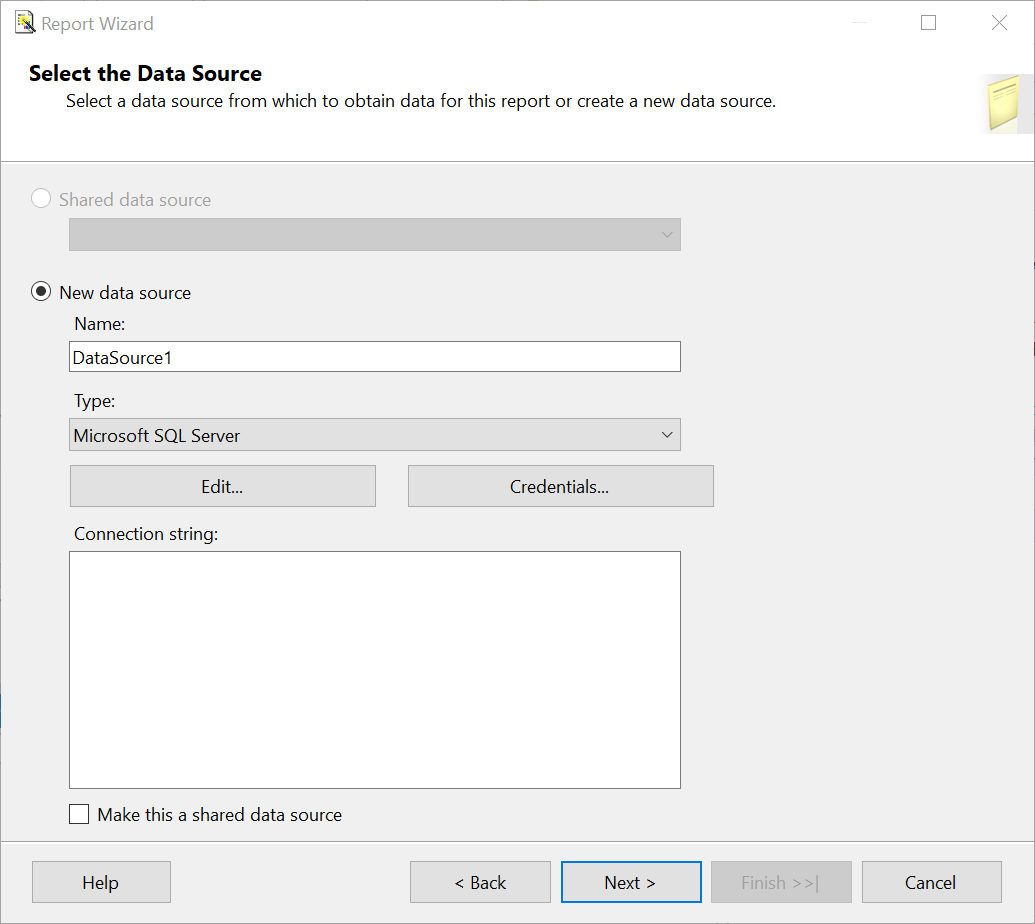
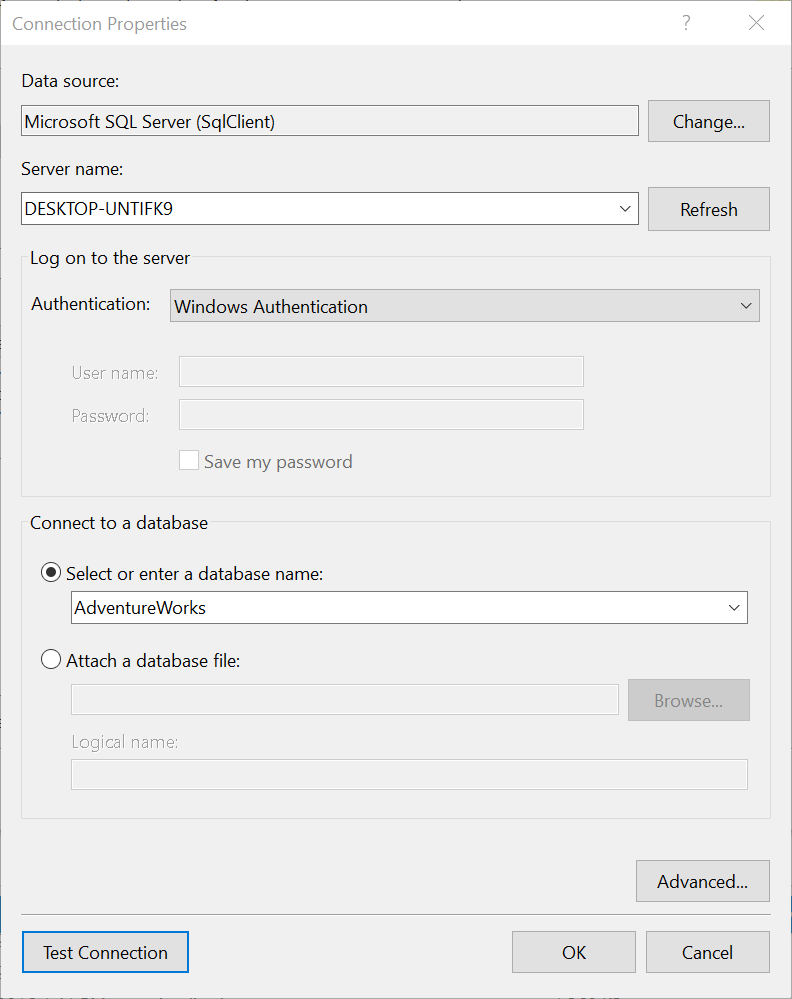
3. Click on the "Edit" button to setup the Data source. In the screenshot below our "AdventureWorks" database is stored in the "DESKTOP-UNTIFK9" Server with Windows Authentication. You can choose to setup the connection to your own database. After setting up the properties, you can click on the "Test Connection" button to ensure a successful connection before proceeding. Click on the "OK" button when you are ready.
4. In the "Select the Data Source" dialog, click on the "Next" button. In the "Design the Query" dialog, click on the "Query Builder" button. You should see the following dialog as shown in the screenshot below:
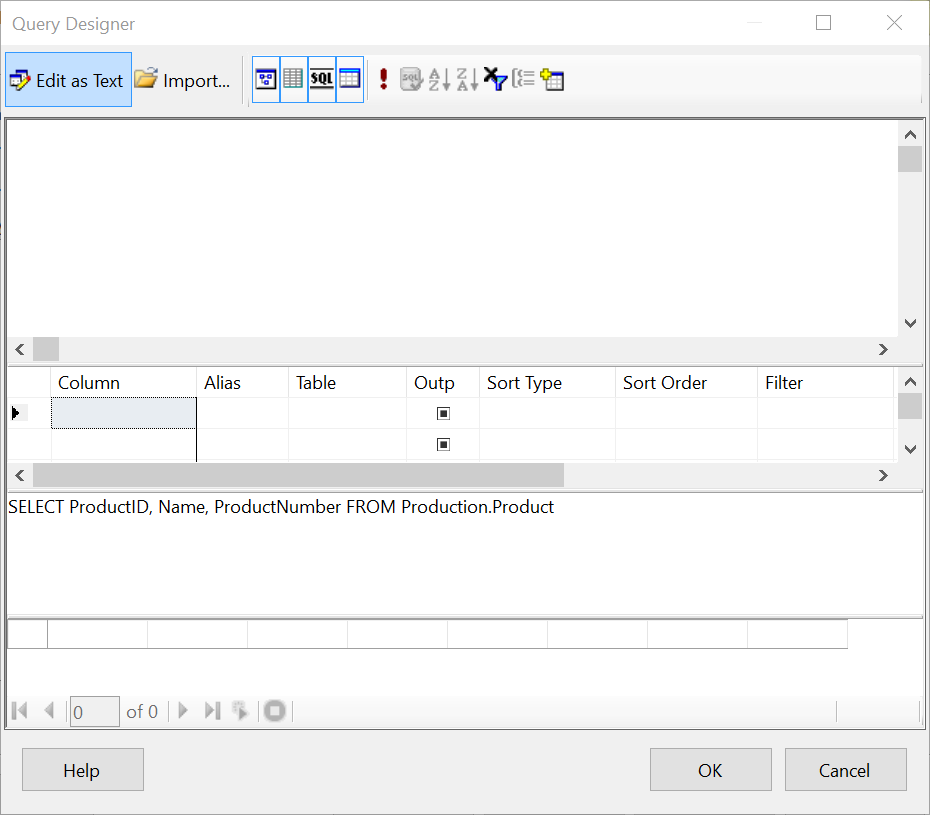
5. We are going to select 3 fields (columns) from the "Production" table. Enter the following query and click on the "OK" button:
SELECT ProductID, Name, ProductNumber from Production.Product
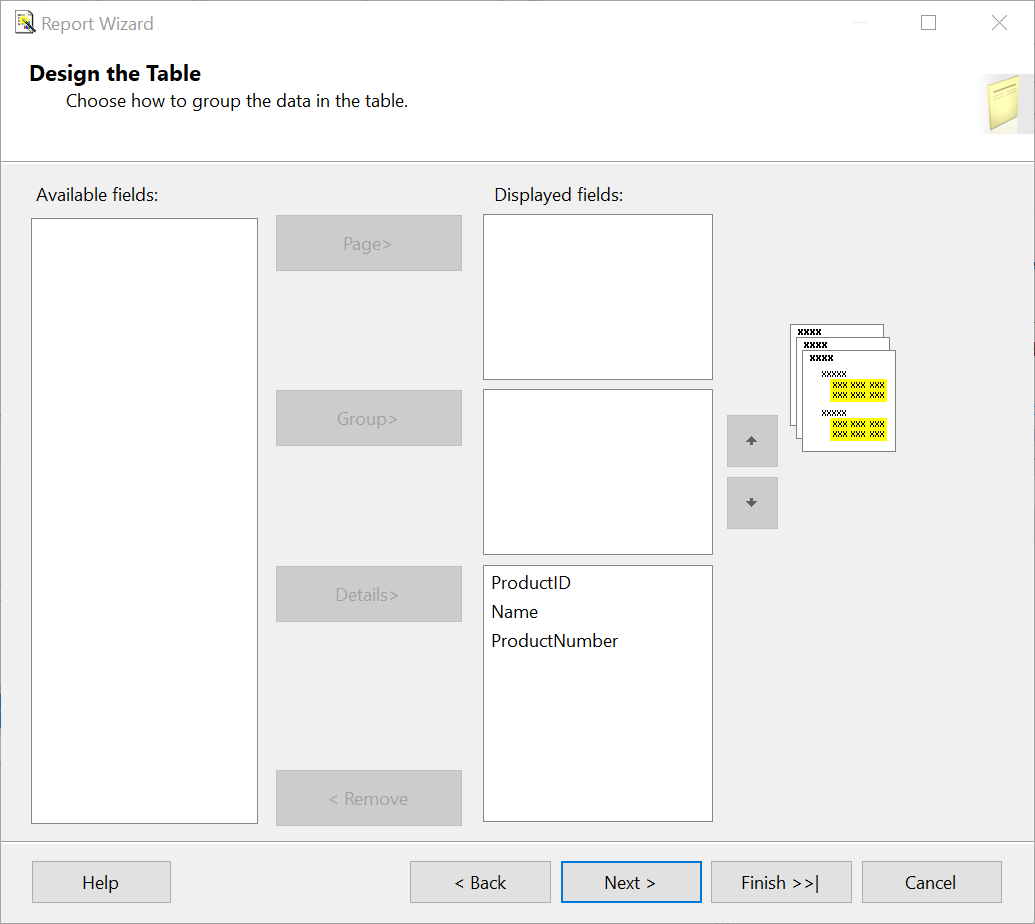
6. In the "Select the Report Type" dialog, select a "Tabular" report and click on the "Next" button. In the "Design the Table" dialog, select all the available fields and add them to the "Details" section as shown below:
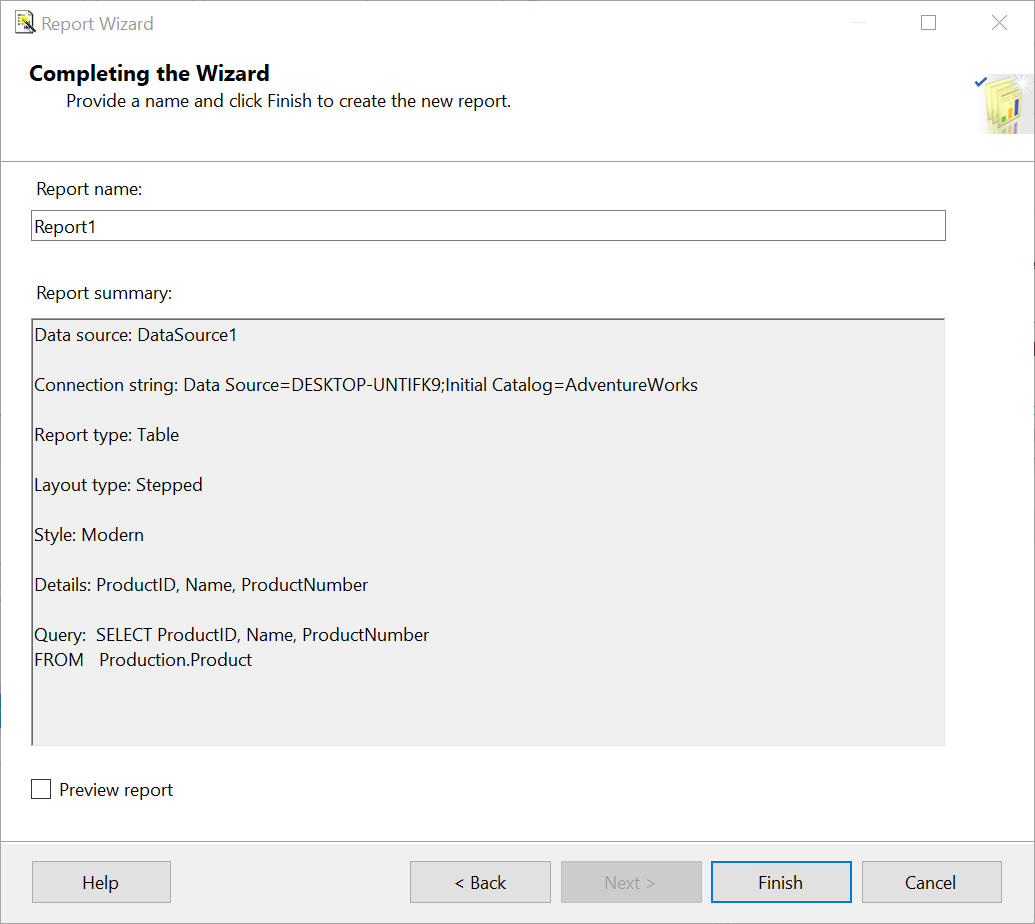
7. Click on the "Next" button followed by the "Finish" button.
8. We have now successfully created Reporting Services (.rdl) report in Visual Studio. If you are using Visual Studio 2019, click on "Report1.rdl" in "Solutions Explorer", and then the "..." button in "Properties -> Assemblies". If you are using Visual Studio 2017, you can click on the "Report -> Report Properties" menu item. This will launch the Report Properties dialog. We are going to add a reference to our "ConnectCodeBarcodeFontsLibrary.dll". This DLL (Dynamic Link Library) will be used to generate a barcode in the report.
Click on the "References" tab and click on the "Add" button followed by the "..." button to add an assembly. In the "Add Reference" dialog, click on the "Browse" tab and navigate to the "C:\Program Files (x86)\ConnectCode\Resource\Net DLL Integration Samples\.Net4.0" folder. Select the "ConnectCodeBarcodeFontsLibrary.dll" and click on the "OK" button.
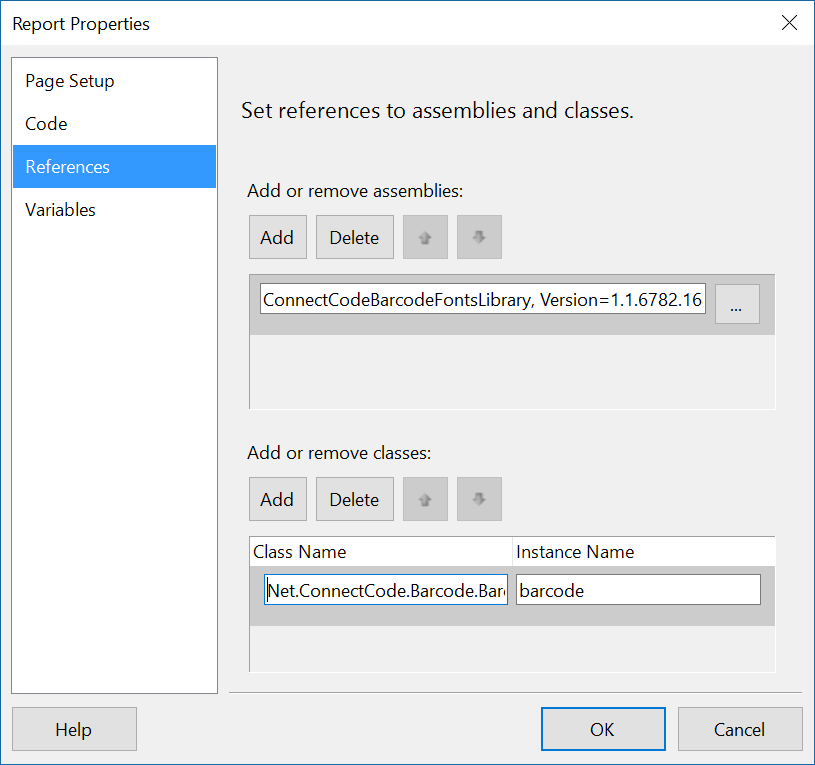
Click on the "Add" button in "Add or remove classes". Enter "Net.ConnectCode.Barcode.BarcodeFonts" as the class name and "barcode" as the instance name and click on the "OK" button. We have successfully added a reference to the DLL and created an instance object for generating barcodes.
9. Click on the Code tab and enter the following:
Public Function MakeBarcode(datastring As String) as String
barcode.BarcodeType = Net.ConnectCode.Barcode.BarcodeFonts.BarcodeEnum.Code128Auto
barcode.Data = datastring
barcode.encode()
return barcode.EncodedData
End Function
The programming codes above uses the barcode instance object to generate a Code 128 (Auto Subset) barcode. In a Code 128 barcode, the check digit is mandatory. For some barcodes such as Code 39, the check digit is optional. You can use the following line to turn the check digit on or off.
barcode.CheckDigit = Net.ConnectCode.Barcode.BarcodeFonts.YesNoEnum.Yes
Next, click on the "OK" button to exit from the "Report Properties" dialog.
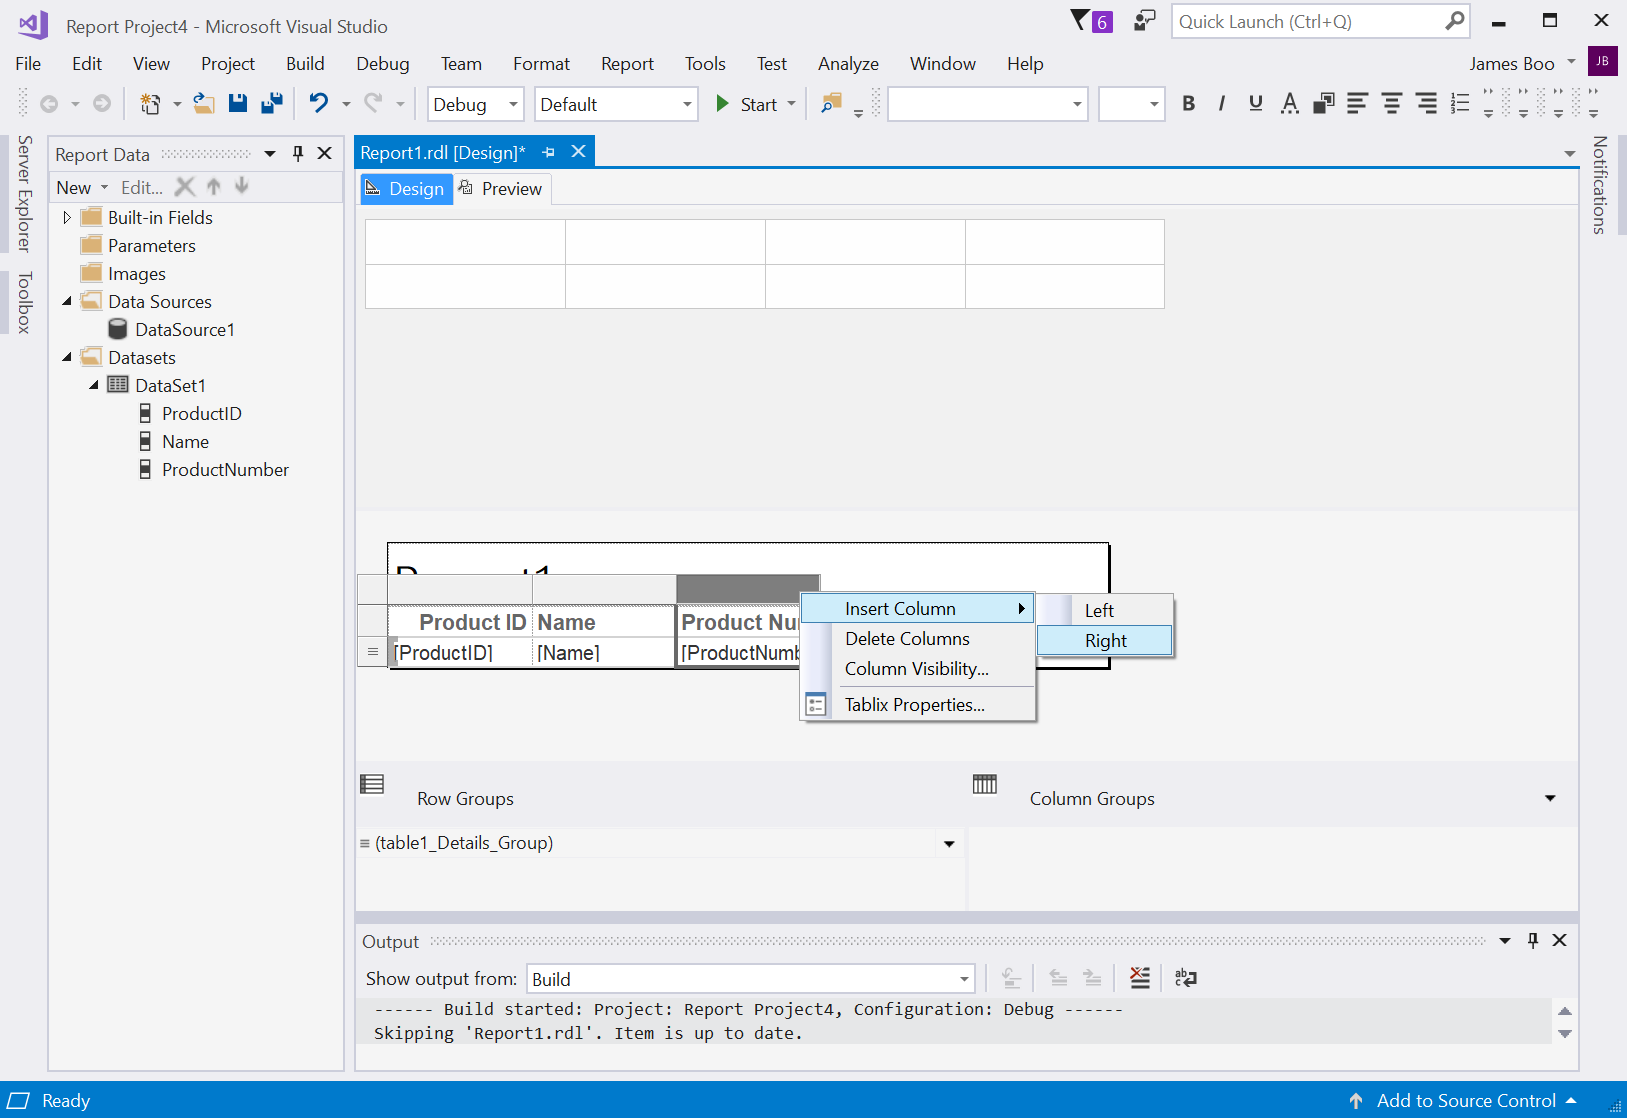
10. In the "Design" tab of "Report1.rdl", right click on the last column of the table and select "Insert Column->Right". We are going to add a column for our barcodes.
11. In the Toolbox, select a "Text box"object and add it into the column from the previous step. The output characters generated by the DLL will be placed in the "Text box".

12. Right click on the "Text Box" object and select "Expression". Enter the following expression:
=Code.MakeBarcode(Fields!ProductNumber.Value)
If you recall, "MakeBarcode" is a function we have defined in "Report Properties". And, in the above, we apply the function on the "ProductNumber" field. The result will be placed in the "Text box" field.
13. In the previous steps, we have defined a "MakeBarcode" function that uses the "ConnectCodeBarcodeFontsLibrary.dll" to generate a barcode. To be more exact, the "MakeBarcode" function returns a stream of output characters. These output characters when applied with a barcode font gives you an industrial quality barcode.
Next, we are going to apply a barcode font to the "Text box" that contains our output characters. Click on the "Text box" object and expand the "Font" properties as shown below. Set the "Font" to "CCode128_S3" (or "CCode128_S3_Trial") and "FontSize" to "24". You can reduce or increase the "FontSize" later to meet the size requirements of your barcode. The registered package of ConnectCode Barcode Software and Fonts also comes with a complete set of fonts with different heights to satisfy all requirements required by the auto-id industry.
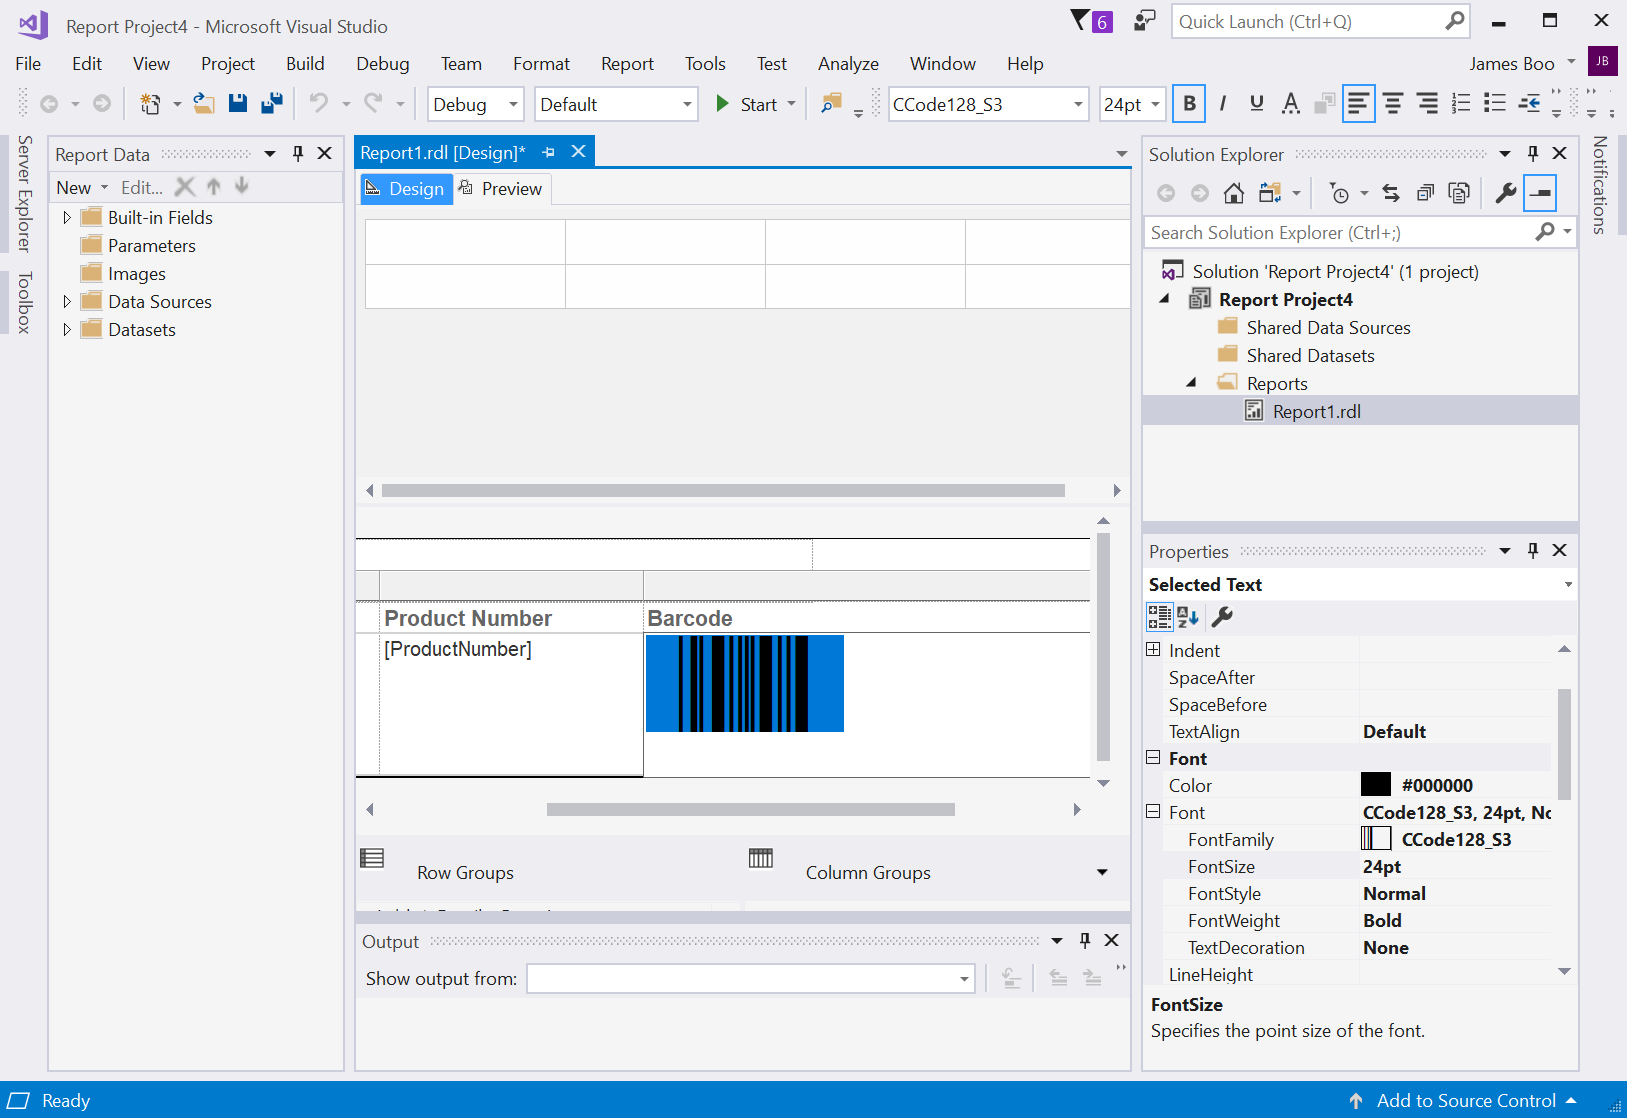
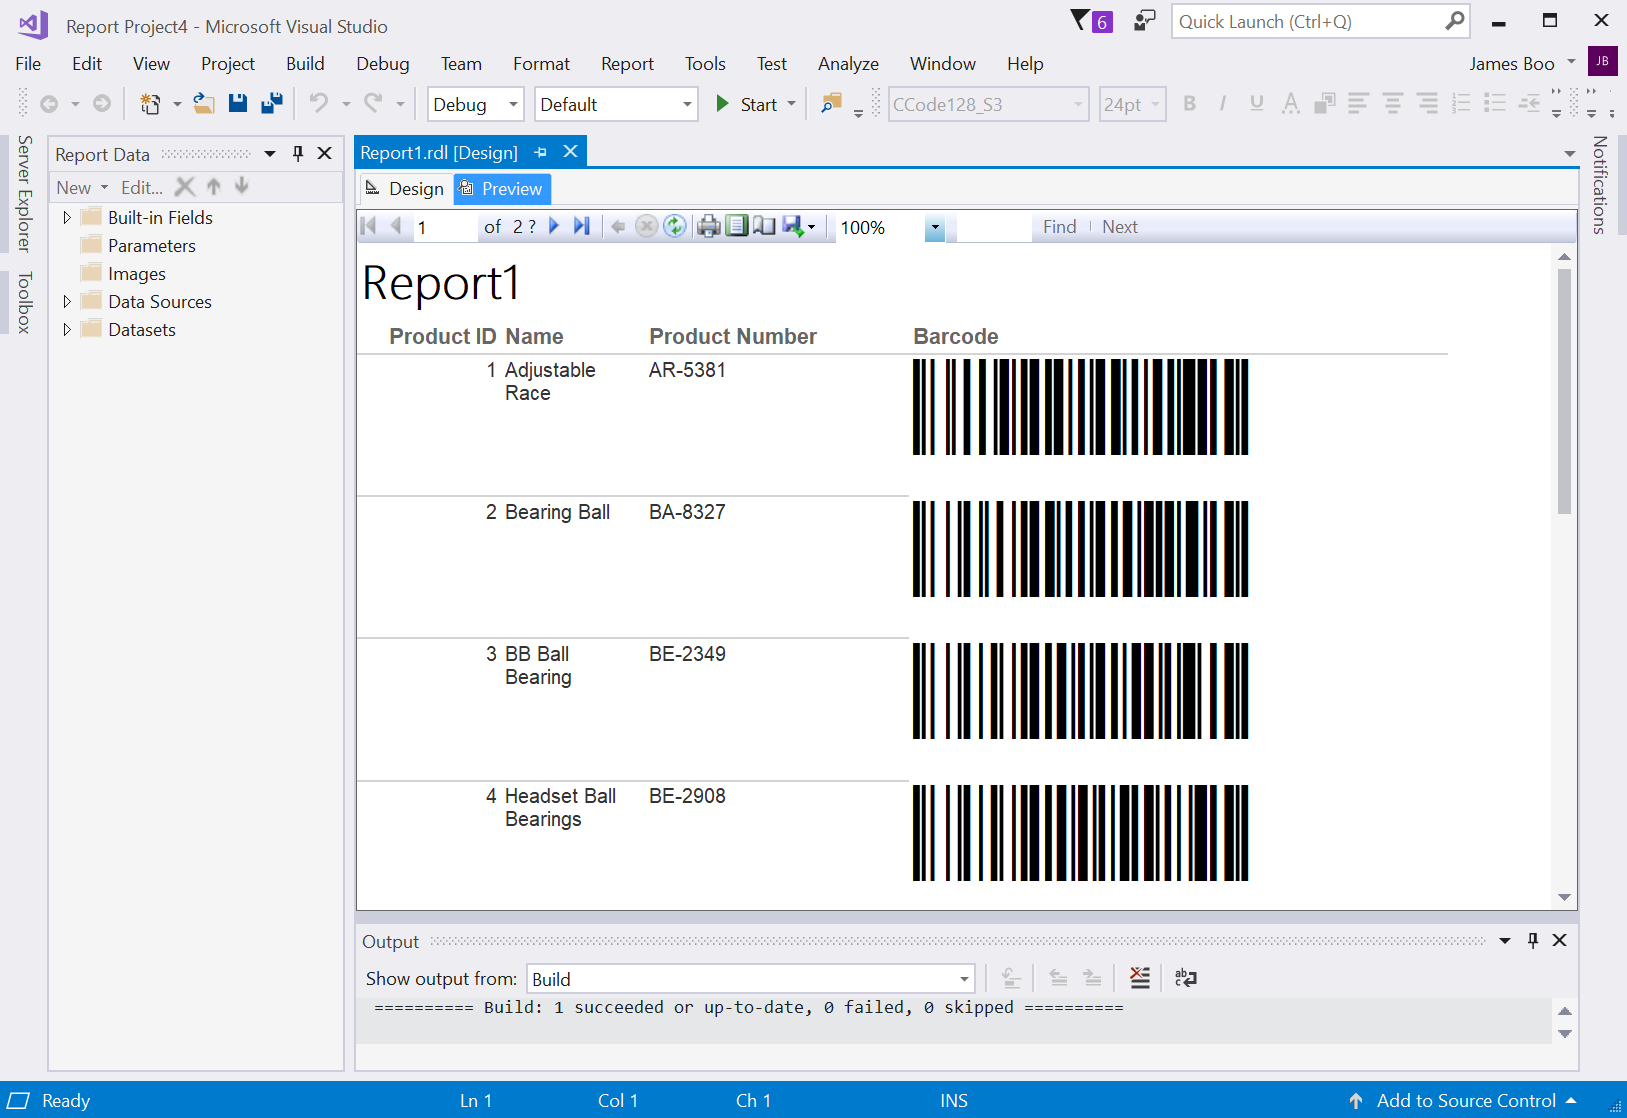
14. Save all the files and click on the "Preview" tab. You should see the following report with Code 128 barcodes generated using the "ProductNumber" field.
The complete list of barcode API functions and fonts available are described at the following:
https://barcoderesource.com/dotNetDLLBarcodeFonts.shtml